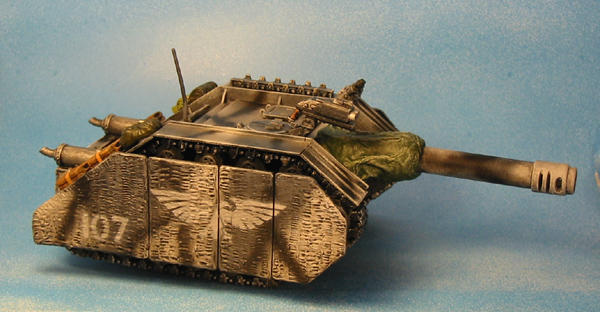
The Destroyer Tank Hunter
By Jeff Hiatt

One of my favorite Warhammer 40K tanks is the Destroyer Tank Hunter. This tank was originally a Forgeworld tank that was available as a modification kit for a Leman Russ main battle tank. That was a pretty cool kit, and I did buy a couple of them (I wish I could find pictures of those). But I thought to myself how difficult could it be to build one myself from all the bits and pieces in my bitsbox. Back in the day I had quite a large bits box I was constructing quite a few models and had lots of leftovers so much so that I was able to build the tank pretty much from scratch which is close to what I did on this.
Let's talk about the body. What I did here was basically take a Chimera chassis as my base for this (now that I think about this I think that this was a Basilisk that I raided for it Earthshaker Cannon). The only parts of that that I really used though were the wheels, the inside mounting brackets for the wheels, the treads, and the front Hull, there are other bits and pieces that I use from that kit on this model, but I'll go into those later on. For the top armor plates, I used plastic sheet cut to shape and put into place.
One of the things I thought was cool about this model when I built it was the standoff armor plating on the sides. I used plasitc L beam and H beam as standoffs from the hull to the armor.
Another thing that is pretty prevalent on this model is the anti-mine paste that I have put on multiple armor pieces along the sides of this model. You can see it on the standoff armor plating, the rear and the front. For this I used Squadron Green Stuff applied on top of the armor and then I use a comb like device to put the ridges in it.
The main gun was fun put together. Essentially what I did is used plastic tube and a Leman Russ anti flash muzzle on the front of it. I cut it at an angle and then mounted it two a piece of plastic then what I did is I took tissue paper had a rubber band and wrapped it around the gun barrel with a rubber band. then I used white glue on the tissue paper for multiple coats. When thoroughly dry I mounted it to the front Hull.
The tread guards were made from plastic sheet and styrene rod glued on the front as you see in a couple of these pictures. They were mounted onto the vehicle using 90-degree brackets that I cut from strip styrene.
You can see other bits from other parts here and there like leman Russ engine gratings, exhaust pipes smoke launchers and tow hooks. I think the commanders hatch came from a space marine vehicle and I think the stowage came from a variety of other vehicles and not 100% sure exactly where those were from.
On the painting this is a pretty simple paint job where I went with a camouflage pattern of Grays, black, and white. The Imperial eagle and the number were stencil's that I made and airbrushed onto the side of the vehicles. I really wish I knew where those stencils were now.
This was one of my first 40K kit bashes. Like all of them I really enjoyed doing him and one of these days I'll probably do something like this again. There are variety of things that I would have done differently on this when I look at it now. One of the things that stands out to me on this one is there is not a rivet visible on this thing. That is something I most definitely would have had on later projects that I worked on. Additionally, looking at the painting the weathering on this was almost nonexistent. I've been doing this now this thing would have had a bunch of rust, mud, dirt, engine grease, and assorted other stuff.
Now that I'm doing a guard army again. It might be time to revisit this type of tank and had it to my new but growing Cadian Astra Militarium force.
Jeff Hiatt 2021